AI 에이전트 협업 패턴: 5개의 전문 에이전트로 풀스택 앱 구축하기
Architecture, Coding, Testing, Security, DevOps Agent를 오케스트레이션하여 프로덕션급 애플리케이션을 구축하는 실전 가이드
멀티 에이전트 시대의 도래
2025년, AI 개발은 새로운 전환점을 맞이했습니다. 단일 AI 에이전트가 모든 작업을 처리하던 시대에서, 여러 전문 에이전트가 협업하는 멀티 에이전트 시스템으로 진화하고 있습니다.
한 명의 개발자가 5개의 전문 에이전트를 오케스트레이션하여 풀스택 애플리케이션을 구축하는 것, 이것이 바로 오늘날의 현실입니다.
왜 멀티 에이전트인가?
단일 에이전트의 한계:
- 컨텍스트 창 제한 (하나의 AI가 모든 것을 기억할 수 없음)
- 전문성 부족 (모든 도메인에 능통할 수 없음)
- 병렬 처리 불가능 (한 번에 하나의 작업만 수행)
멀티 에이전트의 강점:
- 분업과 전문화: 각 에이전트가 특정 영역에 집중
- 병렬 실행: 여러 작업을 동시에 처리
- 확장성: 새로운 에이전트 추가로 기능 확장 가능
- 복원력: 한 에이전트 실패가 전체 시스템에 영향 주지 않음
실제 도요타는 멀티 에이전트 시스템으로 연간 10,000시간 이상 절감했고, 전자상거래 API 프로젝트에서는 버그 70% 감소, 리팩토링 시간 75% 단축이라는 성과를 거두었습니다.
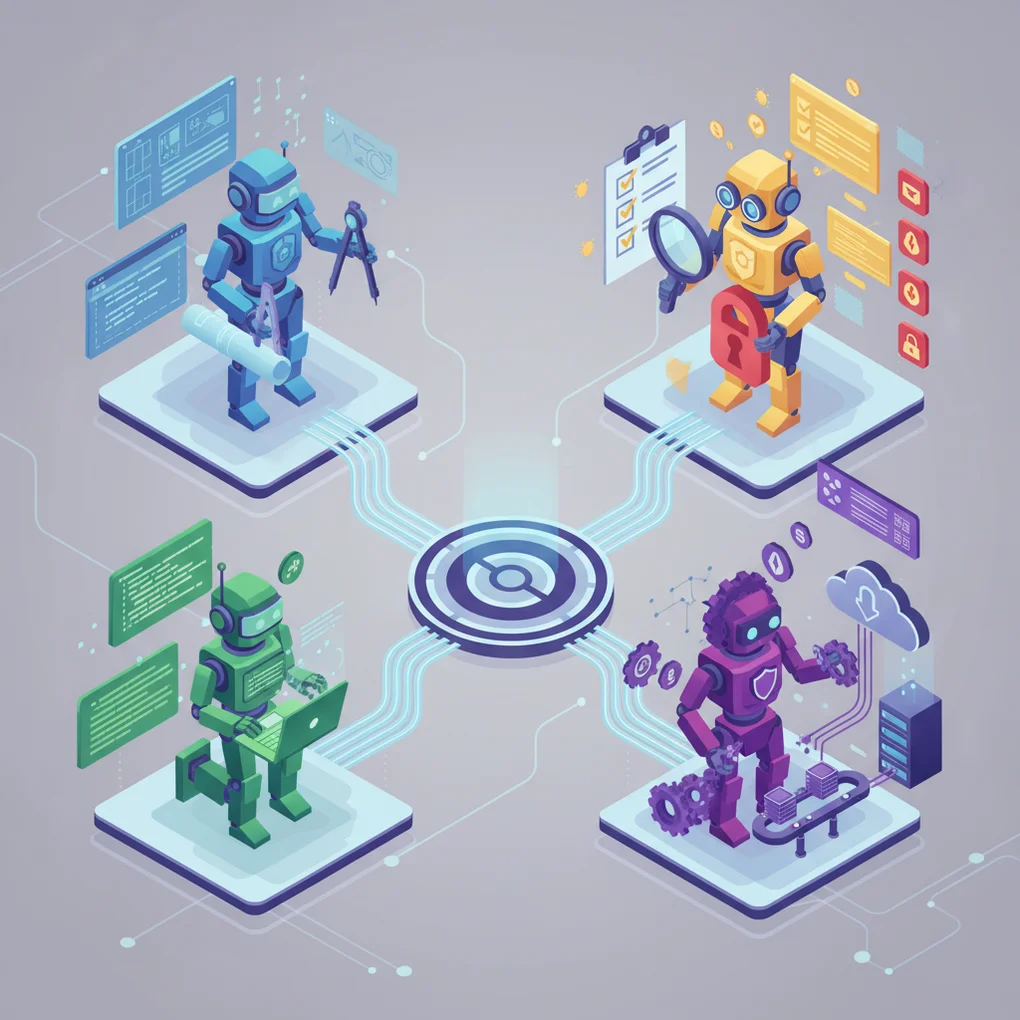
5개 전문 에이전트 아키텍처
풀스택 애플리케이션 개발을 위한 이상적인 에이전트 구성:
1. Architecture Agent (아키텍트 에이전트)
역할: 시스템 설계 및 구조 결정
핵심 책임:
- 시스템 아키텍처 설계 (마이크로서비스, 모놀리식, 서버리스 등)
- 데이터베이스 스키마 설계
- 기술 스택 선정
- 컴포넌트 간 인터페이스 정의
- 확장성 및 성능 고려사항
출력 예시:
## System Architecture

### Technology Stack
- Frontend: React 18 + TypeScript
- Backend: Node.js (Express) + TypeScript
- Database: PostgreSQL 15 + Redis (캐싱)
- Infrastructure: AWS (ECS Fargate, RDS, ElastiCache)

### Component Structure
```
frontend/
├── components/       # React 컴포넌트
├── hooks/           # 커스텀 훅
├── services/        # API 클라이언트
└── store/           # 상태 관리 (Zustand)

backend/
├── domain/          # 비즈니스 로직
├── application/     # 유스케이스
├── infrastructure/  # DB, 외부 API
└── presentation/    # REST 컨트롤러
```

### Database Schema
```sql
CREATE TABLE users (
  id UUID PRIMARY KEY,
  email VARCHAR(255) UNIQUE NOT NULL,
  created_at TIMESTAMP DEFAULT NOW()
);

CREATE TABLE posts (
  id UUID PRIMARY KEY,
  user_id UUID REFERENCES users(id),
  title VARCHAR(255) NOT NULL,
  content TEXT,
  published_at TIMESTAMP
);
```
2. Coding Agent (코딩 에이전트)
역할: 코드 구현 및 생성
핵심 책임:
- Architecture Agent의 설계를 실제 코드로 구현
- 비즈니스 로직 작성
- API 엔드포인트 구현
- 프론트엔드 컴포넌트 개발
- 코드 리뷰 및 리팩토링
실제 성과:
- 구현 시간 35% 단축 (전문 개발자 대상 연구)
- 결함률 27% 감소
구현 예시:
// Architecture Agent 설계 → Coding Agent 구현

// domain/user.entity.ts
export class User {
  constructor(
    public readonly id: string,
    public readonly email: string,
    public readonly createdAt: Date
  ) {}

  static create(email: string): User {
    return new User(
      crypto.randomUUID(),
      email,
      new Date()
    );
  }
}

// application/user.service.ts
export class UserService {
  constructor(private userRepository: UserRepository) {}

  async createUser(email: string): Promise<User> {
    const existingUser = await this.userRepository.findByEmail(email);
    if (existingUser) {
      throw new Error('User already exists');
    }

    const user = User.create(email);
    await this.userRepository.save(user);
    return user;
  }
}

// presentation/user.controller.ts
export class UserController {
  constructor(private userService: UserService) {}

  async create(req: Request, res: Response) {
    try {
      const { email } = req.body;
      const user = await this.userService.createUser(email);
      res.status(201).json(user);
    } catch (error) {
      res.status(400).json({ error: error.message });
    }
  }
}
3. Testing Agent (테스팅 에이전트)
역할: 자동화된 테스트 작성 및 품질 보증
핵심 책임:
- 단위 테스트 생성
- 통합 테스트 작성
- E2E 테스트 시나리오 구현
- 테스트 커버리지 분석
- 버그 탐지 및 보고
테스트 예시:
// user.service.test.ts
describe('UserService', () => {
  let userService: UserService;
  let mockRepository: jest.Mocked<UserRepository>;

  beforeEach(() => {
    mockRepository = {
      findByEmail: jest.fn(),
      save: jest.fn(),
    } as any;
    userService = new UserService(mockRepository);
  });

  describe('createUser', () => {
    it('should create a new user successfully', async () => {
      const email = 'test@example.com';
      mockRepository.findByEmail.mockResolvedValue(null);
      mockRepository.save.mockResolvedValue(undefined);

      const user = await userService.createUser(email);

      expect(user.email).toBe(email);
      expect(mockRepository.save).toHaveBeenCalledWith(
        expect.objectContaining({ email })
      );
    });

    it('should throw error if user already exists', async () => {
      const email = 'existing@example.com';
      const existingUser = User.create(email);
      mockRepository.findByEmail.mockResolvedValue(existingUser);

      await expect(userService.createUser(email)).rejects.toThrow(
        'User already exists'
      );
    });

    it('should generate valid UUID for user ID', async () => {
      mockRepository.findByEmail.mockResolvedValue(null);
      const user = await userService.createUser('test@example.com');

      expect(user.id).toMatch(
        /^[0-9a-f]{8}-[0-9a-f]{4}-4[0-9a-f]{3}-[89ab][0-9a-f]{3}-[0-9a-f]{12}$/i
      );
    });
  });
});

// 통합 테스트
describe('User API Integration', () => {
  it('POST /users should create user and return 201', async () => {
    const response = await request(app)
      .post('/users')
      .send({ email: 'integration@test.com' })
      .expect(201);

    expect(response.body).toMatchObject({
      email: 'integration@test.com',
      id: expect.any(String),
      createdAt: expect.any(String)
    });
  });
});
4. Security Agent (보안 에이전트)
역할: 보안 취약점 탐지 및 방어
핵심 책임:
- 코드 보안 스캐닝
- 취약점 탐지 (SQL 인젝션, XSS, CSRF 등)
- 규정 준수 검증 (GDPR, HIPAA)
- 보안 권장사항 제공
- 위협 분석 및 완화 전략
보안 체크리스트 예시:
## Security Checklist

### Input Validation
- [x] 모든 사용자 입력 검증 (Joi/Zod 스키마)
- [x] SQL 인젝션 방지 (매개변수화된 쿼리)
- [x] XSS 방지 (입력 sanitization)
- [x] 파일 업로드 검증 (MIME 타입, 크기 제한)

### Authentication & Authorization
- [x] 비밀번호 해싱 (bcrypt, 비용 계수 12)
- [x] JWT 토큰 만료 설정 (액세스 15분, 리프레시 7일)
- [x] 속도 제한 (IP당 15분에 100회)
- [x] HTTPS 강제 (프로덕션)

### Data Protection
- [x] 환경 변수로 비밀키 관리
- [x] 데이터베이스 암호화 (at-rest, in-transit)
- [x] CORS 화이트리스트 설정
- [x] 민감 정보 로깅 방지

### Compliance
- [x] GDPR: 사용자 데이터 삭제 API
- [x] 로그 보관 정책 (90일)
- [x] 개인정보 처리방침 업데이트
취약점 보고 예시:
// ❌ Security Agent가 탐지한 취약점
app.get('/user/:id', (req, res) => {
  const query = `SELECT * FROM users WHERE id = '${req.params.id}'`;
  // SQL Injection 위험!
  db.query(query, (err, result) => {
    res.json(result);
  });
});

// ✅ Security Agent가 제안한 수정
app.get('/user/:id', async (req, res) => {
  const { id } = req.params;

  // 입력 검증
  const schema = Joi.object({
    id: Joi.string().uuid().required()
  });
  const { error } = schema.validate({ id });
  if (error) {
    return res.status(400).json({ error: 'Invalid user ID' });
  }

  // 매개변수화된 쿼리
  const result = await db.query(
    'SELECT * FROM users WHERE id = $1',
    [id]
  );
  res.json(result.rows[0]);
});
5. DevOps Agent (데브옵스 에이전트)
역할: CI/CD, 배포, 모니터링
핵심 책임:
- CI/CD 파이프라인 구성
- 인프라 프로비저닝 (Terraform, CloudFormation)
- 컨테이너화 (Docker, Kubernetes)
- 모니터링 및 알림 설정
- 성능 최적화
실제 성과: 화학 산업 사례에서 품질 실패 30% 감소
CI/CD 파이프라인 예시:
# .github/workflows/deploy.yml
name: Deploy to Production

on:
  push:
    branches: [main]

jobs:
  test:
    runs-on: ubuntu-latest
    steps:
      - uses: actions/checkout@v3
      - name: Run Tests
        run: |
          npm ci
          npm test -- --coverage
          # Testing Agent가 생성한 테스트 실행

  security:
    runs-on: ubuntu-latest
    steps:
      - uses: actions/checkout@v3
      - name: Security Scan
        run: |
          npm audit
          # Security Agent가 정의한 보안 체크
          npx snyk test

  build:
    needs: [test, security]
    runs-on: ubuntu-latest
    steps:
      - uses: actions/checkout@v3
      - name: Build Docker Image
        run: |
          docker build -t myapp:${{ github.sha }} .
          docker push myapp:${{ github.sha }}

  deploy:
    needs: build
    runs-on: ubuntu-latest
    steps:
      - name: Deploy to ECS
        run: |
          aws ecs update-service \
            --cluster production \
            --service myapp \
            --force-new-deployment

      - name: Health Check
        run: |
          # DevOps Agent가 정의한 헬스 체크
          for i in {1..30}; do
            if curl -f https://api.example.com/health; then
              echo "Deployment successful"
              exit 0
            fi
            sleep 10
          done
          echo "Deployment failed"
          exit 1
에이전트 오케스트레이션 패턴
1. 계층적 오케스트레이션 (Hierarchical)
구조: Manager 에이전트가 5개 전문 에이전트를 조율
graph TD
    Manager[Manager Agent<br/>Orchestrator] --> Architecture[Architecture Agent]
    Manager --> Coding[Coding Agent]
    Manager --> Testing[Testing Agent]
    Manager --> Security[Security Agent]
Manager --> DevOps[DevOps Agent]장점:
- 명확한 명령 구조
- 중앙 집중식 진행 추적
- 디버깅 용이
적합한 경우:
- 작업을 명확히 분해할 수 있는 경우
- 중앙 모니터링이 필요한 경우
- 팀이 구조화된 워크플로우를 선호하는 경우
실제 구현 (LangGraph 사용):
from langgraph.graph import StateGraph, END

# 상태 정의
class AppState(TypedDict):
    requirements: str
    architecture: dict
    code: dict
    tests: dict
    security_report: dict
    deployment_config: dict

# 그래프 생성
workflow = StateGraph(AppState)

# 노드 추가 (각 노드 = 에이전트)
workflow.add_node("architect", architecture_agent)
workflow.add_node("coder", coding_agent)
workflow.add_node("tester", testing_agent)
workflow.add_node("security", security_agent)
workflow.add_node("devops", devops_agent)

# 엣지 추가 (작업 흐름)
workflow.add_edge("architect", "coder")
workflow.add_edge("coder", "tester")
workflow.add_edge("tester", "security")
workflow.add_edge("security", "devops")
workflow.add_edge("devops", END)

# 시작점 설정
workflow.set_entry_point("architect")

# 실행
app = workflow.compile()
result = app.invoke({
    "requirements": "Build a REST API for user management"
})
2. 이벤트 주도 아키텍처 (Event-Driven)
구조: 에이전트 간 비동기 이벤트 스트리밍
장점:
- 서비스 분리 (각 에이전트는 이벤트 라우터만 인식)
- 장애 격리 (한 에이전트 실패가 전파되지 않음)
- 확장 가능한 조정
- 실시간 처리
이벤트 플로우 예시:
sequenceDiagram
    participant User as 사용자
    participant ER as 이벤트 라우터
    participant Arch as Architecture Agent
    participant Code as Coding Agent
    participant Test as Testing Agent
    participant Sec as Security Agent
    participant Dev as DevOps Agent

    User->>ER: 사용자 요청
    ER->>Arch: ARCHITECTURE_REQUEST
    Arch->>ER: ARCHITECTURE_COMPLETED
    ER->>Code: CODE_GENERATED
    Code->>ER: CODE_COMPLETED
    ER->>Test: TEST_REQUEST
    Test->>ER: TESTS_COMPLETED
    ER->>Sec: SECURITY_SCAN_REQUEST
    Sec->>ER: SECURITY_APPROVED
    ER->>Dev: DEPLOY_REQUEST
    Dev->>ER: DEPLOYED
    ER->>User: 완료 응답
Redis Streams 구현:
import Redis from 'ioredis';

const redis = new Redis();

// Architecture Agent: 이벤트 발행
async function publishArchitectureComplete(architecture: any) {
  await redis.xadd(
    'agent-events',
    '*',
    'type', 'ARCHITECTURE_COMPLETED',
    'data', JSON.stringify(architecture),
    'timestamp', Date.now().toString()
  );
}

// Coding Agent: 이벤트 구독
async function listenForArchitecture() {
  const consumer = redis.duplicate();

  // 컨슈머 그룹 생성
  await consumer.xgroup(
    'CREATE', 'agent-events', 'coding-group', '0', 'MKSTREAM'
  ).catch(() => {}); // 이미 존재하면 무시

  while (true) {
    const events = await consumer.xreadgroup(
      'GROUP', 'coding-group', 'coder-1',
      'BLOCK', 5000,
      'STREAMS', 'agent-events', '>'
    );

    if (!events) continue;

    for (const [stream, messages] of events) {
      for (const [id, fields] of messages) {
        const event = parseEvent(fields);

        if (event.type === 'ARCHITECTURE_COMPLETED') {
          await generateCode(event.data);
          await redis.xack('agent-events', 'coding-group', id);
        }
      }
    }
  }
}
3. 그래프 기반 오케스트레이션
구조: DAG (Directed Acyclic Graph)로 의존성 표현
장점:
- 시각적 워크플로우 표현
- 병렬 작업 실행 가능
- 명확한 의존성 관리
병렬 실행 예시:
graph TB
    Arch[Architecture Agent] --> CodeFE[Coding Agent<br/>Frontend]
    Arch --> CodeBE[Coding Agent<br/>Backend]
    CodeFE --> Test[Testing Agent]
    CodeBE --> Test
    Test --> Sec[Security Agent]
    Sec --> DevOps[DevOps Agent]
에이전트 간 통신 프로토콜
Model Context Protocol (MCP)
개발: Anthropic (2024 오픈소스), OpenAI 공식 채택 (2025년 3월)
목적: 에이전트 ↔ 도구/메모리 간 수직적 통신
특징:
- JSON-RPC 클라이언트-서버 인터페이스
- 보안 컨텍스트 주입
- 구조화된 도구 호출
- 리소스 관리
- 접근 제어 강제
사용 예시:
// MCP 요청: Coding Agent → 데이터베이스 도구
{
  "jsonrpc": "2.0",
  "id": 1,
  "method": "tools/call",
  "params": {
    "name": "database_query",
    "arguments": {
      "query": "SELECT * FROM users WHERE id = $1",
      "params": ["user-123"]
    }
  }
}

// MCP 응답
{
  "jsonrpc": "2.0",
  "id": 1,
  "result": {
    "content": [
      {
        "type": "text",
        "text": "{\"id\": \"user-123\", \"email\": \"test@example.com\"}"
      }
    ]
  }
}
글로벌 채택률: 2025년 기준 전 세계 조직의 78%가 MCP 또는 A2A 프로토콜 사용
Agent-to-Agent Protocol (A2A)
목적: 에이전트 ↔ 에이전트 간 수평적 통신
차이점:
- MCP: 에이전트가 도구나 메모리에 접근할 때
- A2A: 에이전트끼리 직접 소통할 때
A2A 메시지 예시:
// Architecture Agent → Coding Agent
{
  "from": "architecture-agent",
  "to": "coding-agent",
  "type": "TASK_ASSIGNMENT",
  "payload": {
    "task_id": "impl-user-api",
    "architecture": {
      "pattern": "clean-architecture",
      "layers": ["domain", "application", "infrastructure", "presentation"],
      "database": "postgresql"
    },
    "deadline": "2025-10-17T10:00:00Z"
  },
  "metadata": {
    "priority": "high",
    "confidence_score": 0.95
  }
}

// Coding Agent → Architecture Agent (완료 알림)
{
  "from": "coding-agent",
  "to": "architecture-agent",
  "type": "TASK_COMPLETED",
  "payload": {
    "task_id": "impl-user-api",
    "files_created": [
      "src/domain/user.entity.ts",
      "src/application/user.service.ts",
      "src/infrastructure/user.repository.ts",
      "src/presentation/user.controller.ts"
    ],
    "status": "success"
  }
}
에러 처리 및 복원력
1. Fallback 전략
3단계 Fallback:
async function executeWithFallback(task: Task) {
  try {
    // Level 1: 기본 LLM (GPT-4)
    return await primaryAgent.execute(task);
  } catch (error) {
    console.warn('Primary agent failed, trying fallback');

    try {
      // Level 2: 대체 LLM (Claude)
      return await fallbackAgent.execute(task);
    } catch (fallbackError) {
      // Level 3: Human-in-the-Loop
      return await escalateToHuman(task, [error, fallbackError]);
    }
  }
}
2. 점진적 롤아웃 (Canary Deployment)
에이전트 배포 전략:
# Canary 배포: 5% → 50% → 100%
deployment:
  strategy: canary
  steps:
    - percentage: 5
      duration: 1h
      metrics:
        - error_rate < 1%
        - response_time < 200ms

    - percentage: 50
      duration: 2h
      metrics:
        - error_rate < 0.5%
        - user_satisfaction > 4.5/5

    - percentage: 100
      # 모든 메트릭 통과 시에만 전체 롤아웃
3. Circuit Breaker 패턴
에이전트 간 장애 전파 방지:
class CircuitBreaker {
  private failureCount = 0;
  private lastFailureTime: number | null = null;
  private state: 'CLOSED' | 'OPEN' | 'HALF_OPEN' = 'CLOSED';

  async call(agent: Agent, task: Task) {
    if (this.state === 'OPEN') {
      if (Date.now() - this.lastFailureTime! > 60000) {
        // 1분 후 재시도
        this.state = 'HALF_OPEN';
      } else {
        throw new Error('Circuit breaker is OPEN');
      }
    }

    try {
      const result = await agent.execute(task);
      this.onSuccess();
      return result;
    } catch (error) {
      this.onFailure();
      throw error;
    }
  }

  private onSuccess() {
    this.failureCount = 0;
    this.state = 'CLOSED';
  }

  private onFailure() {
    this.failureCount++;
    this.lastFailureTime = Date.now();

    if (this.failureCount >= 5) {
      this.state = 'OPEN';
      console.error('Circuit breaker opened after 5 failures');
    }
  }
}
실전 예제: Todo API 구축
전체 워크플로우를 5개 에이전트로 구현해봅시다.
요구사항
## Todo API 요구사항

- 사용자별 할 일 목록 관리
- CRUD 작업 (생성, 조회, 수정, 삭제)
- 완료 상태 토글
- 마감일 관리
- RESTful API
Phase 1: Architecture Agent
## Architecture Design

### Technology Stack
- Backend: Node.js (Express) + TypeScript
- Database: PostgreSQL
- Cache: Redis (조회 성능 최적화)
- Testing: Jest + Supertest

### Database Schema
CREATE TABLE todos (
  id UUID PRIMARY KEY DEFAULT gen_random_uuid(),
  user_id UUID NOT NULL,
  title VARCHAR(255) NOT NULL,
  description TEXT,
  completed BOOLEAN DEFAULT FALSE,
  due_date TIMESTAMP,
  created_at TIMESTAMP DEFAULT NOW(),
  updated_at TIMESTAMP DEFAULT NOW()
);

CREATE INDEX idx_todos_user_id ON todos(user_id);
CREATE INDEX idx_todos_completed ON todos(completed);

### API Endpoints
- POST   /todos        → 할 일 생성
- GET    /todos        → 목록 조회
- GET    /todos/:id    → 단일 조회
- PUT    /todos/:id    → 수정
- DELETE /todos/:id    → 삭제
- PATCH  /todos/:id/toggle → 완료 토글
Phase 2: Coding Agent
// domain/todo.entity.ts
export class Todo {
  constructor(
    public readonly id: string,
    public readonly userId: string,
    public title: string,
    public description: string,
    public completed: boolean,
    public dueDate: Date | null,
    public readonly createdAt: Date,
    public updatedAt: Date
  ) {}

  static create(userId: string, title: string, description: string = '', dueDate: Date | null = null): Todo {
    return new Todo(
      crypto.randomUUID(),
      userId,
      title,
      description,
      false,
      dueDate,
      new Date(),
      new Date()
    );
  }

  toggle(): void {
    this.completed = !this.completed;
    this.updatedAt = new Date();
  }

  update(title?: string, description?: string, dueDate?: Date | null): void {
    if (title !== undefined) this.title = title;
    if (description !== undefined) this.description = description;
    if (dueDate !== undefined) this.dueDate = dueDate;
    this.updatedAt = new Date();
  }
}

// application/todo.service.ts
export class TodoService {
  constructor(
    private todoRepository: TodoRepository,
    private cache: RedisClient
  ) {}

  async createTodo(userId: string, title: string, description?: string, dueDate?: Date): Promise<Todo> {
    const todo = Todo.create(userId, title, description, dueDate);
    await this.todoRepository.save(todo);
    await this.cache.del(`todos:${userId}`); // 캐시 무효화
    return todo;
  }

  async getTodos(userId: string): Promise<Todo[]> {
    const cached = await this.cache.get(`todos:${userId}`);
    if (cached) {
      return JSON.parse(cached);
    }

    const todos = await this.todoRepository.findByUserId(userId);
    await this.cache.setex(`todos:${userId}`, 300, JSON.stringify(todos)); // 5분 캐싱
    return todos;
  }

  async toggleTodo(id: string, userId: string): Promise<Todo> {
    const todo = await this.todoRepository.findById(id);
    if (!todo || todo.userId !== userId) {
      throw new Error('Todo not found');
    }

    todo.toggle();
    await this.todoRepository.save(todo);
    await this.cache.del(`todos:${userId}`);
    return todo;
  }
}

// presentation/todo.controller.ts
export class TodoController {
  constructor(private todoService: TodoService) {}

  create = async (req: Request, res: Response) => {
    try {
      const { title, description, dueDate } = req.body;
      const userId = req.user!.id; // 인증 미들웨어에서 주입

      const todo = await this.todoService.createTodo(
        userId,
        title,
        description,
        dueDate ? new Date(dueDate) : undefined
      );

      res.status(201).json(todo);
    } catch (error) {
      res.status(400).json({ error: error.message });
    }
  };

  list = async (req: Request, res: Response) => {
    const userId = req.user!.id;
    const todos = await this.todoService.getTodos(userId);
    res.json(todos);
  };

  toggle = async (req: Request, res: Response) => {
    try {
      const { id } = req.params;
      const userId = req.user!.id;

      const todo = await this.todoService.toggleTodo(id, userId);
      res.json(todo);
    } catch (error) {
      res.status(404).json({ error: error.message });
    }
  };
}
Phase 3: Testing Agent
// todo.service.test.ts
describe('TodoService', () => {
  let service: TodoService;
  let mockRepository: jest.Mocked<TodoRepository>;
  let mockCache: jest.Mocked<RedisClient>;

  beforeEach(() => {
    mockRepository = {
      save: jest.fn(),
      findByUserId: jest.fn(),
      findById: jest.fn(),
    } as any;

    mockCache = {
      get: jest.fn(),
      setex: jest.fn(),
      del: jest.fn(),
    } as any;

    service = new TodoService(mockRepository, mockCache);
  });

  describe('createTodo', () => {
    it('should create todo and invalidate cache', async () => {
      const userId = 'user-123';
      const title = 'Buy groceries';

      const todo = await service.createTodo(userId, title);

      expect(todo.title).toBe(title);
      expect(todo.userId).toBe(userId);
      expect(todo.completed).toBe(false);
      expect(mockRepository.save).toHaveBeenCalled();
      expect(mockCache.del).toHaveBeenCalledWith(`todos:${userId}`);
    });
  });

  describe('getTodos', () => {
    it('should return cached todos if available', async () => {
      const userId = 'user-123';
      const cachedTodos = [{ id: '1', title: 'Test' }];
      mockCache.get.mockResolvedValue(JSON.stringify(cachedTodos));

      const todos = await service.getTodos(userId);

      expect(todos).toEqual(cachedTodos);
      expect(mockRepository.findByUserId).not.toHaveBeenCalled();
    });

    it('should fetch from DB and cache if not cached', async () => {
      const userId = 'user-123';
      const dbTodos = [Todo.create(userId, 'Test')];
      mockCache.get.mockResolvedValue(null);
      mockRepository.findByUserId.mockResolvedValue(dbTodos);

      const todos = await service.getTodos(userId);

      expect(todos).toEqual(dbTodos);
      expect(mockCache.setex).toHaveBeenCalledWith(
        `todos:${userId}`,
        300,
        JSON.stringify(dbTodos)
      );
    });
  });

  describe('toggleTodo', () => {
    it('should toggle todo completion status', async () => {
      const todo = Todo.create('user-123', 'Test');
      mockRepository.findById.mockResolvedValue(todo);

      const result = await service.toggleTodo(todo.id, 'user-123');

      expect(result.completed).toBe(true);
      expect(mockRepository.save).toHaveBeenCalled();
    });

    it('should throw error if todo not found', async () => {
      mockRepository.findById.mockResolvedValue(null);

      await expect(
        service.toggleTodo('invalid-id', 'user-123')
      ).rejects.toThrow('Todo not found');
    });

    it('should throw error if user does not own todo', async () => {
      const todo = Todo.create('other-user', 'Test');
      mockRepository.findById.mockResolvedValue(todo);

      await expect(
        service.toggleTodo(todo.id, 'user-123')
      ).rejects.toThrow('Todo not found');
    });
  });
});

// 통합 테스트
describe('Todo API Integration', () => {
  it('should create and retrieve todos', async () => {
    const createRes = await request(app)
      .post('/todos')
      .set('Authorization', 'Bearer test-token')
      .send({ title: 'Integration Test', description: 'Test todo' })
      .expect(201);

    expect(createRes.body).toMatchObject({
      title: 'Integration Test',
      completed: false
    });

    const listRes = await request(app)
      .get('/todos')
      .set('Authorization', 'Bearer test-token')
      .expect(200);

    expect(listRes.body).toHaveLength(1);
    expect(listRes.body[0].title).toBe('Integration Test');
  });
});
Phase 4: Security Agent
## Security Report

### Vulnerabilities Found: 2

#### 1. Missing Input Validation (HIGH)
**Location**: `todo.controller.ts:create()`
**Issue**: User input not validated before processing
**Recommendation**: Add Joi/Zod schema validation

#### 2. Cache Poisoning Risk (MEDIUM)
**Location**: `todo.service.ts:getTodos()`
**Issue**: Cache key based on user ID only, no integrity check
**Recommendation**: Add HMAC signature to cache keys

### Recommendations Applied:

```typescript
// 수정된 todo.controller.ts
import Joi from 'joi';

const createTodoSchema = Joi.object({
  title: Joi.string().min(1).max(255).required(),
  description: Joi.string().max(5000).optional(),
  dueDate: Joi.date().iso().optional()
});

export class TodoController {
  create = async (req: Request, res: Response) => {
    // 입력 검증 추가
    const { error, value } = createTodoSchema.validate(req.body);
    if (error) {
      return res.status(400).json({ error: error.details[0].message });
    }

    try {
      const { title, description, dueDate } = value;
      const userId = req.user!.id;

      const todo = await this.todoService.createTodo(
        userId,
        title,
        description,
        dueDate ? new Date(dueDate) : undefined
      );

      res.status(201).json(todo);
    } catch (error) {
      res.status(500).json({ error: 'Internal server error' });
    }
  };
}

// 수정된 todo.service.ts (캐시 보안 강화)
import crypto from 'crypto';

export class TodoService {
  private generateCacheKey(userId: string): string {
    const hmac = crypto.createHmac('sha256', process.env.CACHE_SECRET!);
    hmac.update(userId);
    const signature = hmac.digest('hex');
    return `todos:${userId}:${signature}`;
  }

  async getTodos(userId: string): Promise<Todo[]> {
    const cacheKey = this.generateCacheKey(userId);
    const cached = await this.cache.get(cacheKey);
    if (cached) {
      return JSON.parse(cached);
    }

    const todos = await this.todoRepository.findByUserId(userId);
    await this.cache.setex(cacheKey, 300, JSON.stringify(todos));
    return todos;
  }
}
```
Phase 5: DevOps Agent
# .github/workflows/deploy.yml
name: Deploy Todo API

on:
  push:
    branches: [main]

jobs:
  test:
    runs-on: ubuntu-latest
    steps:
      - uses: actions/checkout@v3

      - name: Setup Node.js
        uses: actions/setup-node@v3
        with:
          node-version: '18'

      - name: Install Dependencies
        run: npm ci

      - name: Run Tests
        run: npm test -- --coverage --coverageThreshold='{"global":{"lines":90}}'

      - name: Upload Coverage
        uses: codecov/codecov-action@v3

  security:
    runs-on: ubuntu-latest
    steps:
      - uses: actions/checkout@v3

      - name: Security Audit
        run: |
          npm audit --audit-level=moderate
          npx snyk test

      - name: SAST Scan
        uses: github/codeql-action/analyze@v2

  build:
    needs: [test, security]
    runs-on: ubuntu-latest
    steps:
      - uses: actions/checkout@v3

      - name: Build Docker Image
        run: |
          docker build -t todo-api:${{ github.sha }} .
          docker tag todo-api:${{ github.sha }} todo-api:latest

      - name: Push to ECR
        run: |
          aws ecr get-login-password | docker login --username AWS --password-stdin $ECR_REGISTRY
          docker push todo-api:${{ github.sha }}
          docker push todo-api:latest

  deploy:
    needs: build
    runs-on: ubuntu-latest
    steps:
      - name: Deploy to ECS
        run: |
          aws ecs update-service \
            --cluster production \
            --service todo-api \
            --force-new-deployment

      - name: Wait for Deployment
        run: |
          aws ecs wait services-stable \
            --cluster production \
            --services todo-api

      - name: Health Check
        run: |
          for i in {1..30}; do
            STATUS=$(curl -s -o /dev/null -w '%{http_code}' https://api.example.com/health)
            if [ "$STATUS" -eq 200 ]; then
              echo "✅ Deployment successful"
              exit 0
            fi
            echo "Waiting for service... (attempt $i/30)"
            sleep 10
          done
          echo "❌ Deployment failed"
          exit 1

      - name: Notify Slack
        if: always()
        run: |
          curl -X POST ${{ secrets.SLACK_WEBHOOK }} \
            -H 'Content-Type: application/json' \
            -d "{\"text\":\"Todo API deployment: ${{ job.status }}\"}"

# Terraform 인프라 코드
# infrastructure/main.tf
resource "aws_ecs_service" "todo_api" {
  name            = "todo-api"
  cluster         = aws_ecs_cluster.main.id
  task_definition = aws_ecs_task_definition.todo_api.arn
  desired_count   = 3
  launch_type     = "FARGATE"

  load_balancer {
    target_group_arn = aws_lb_target_group.todo_api.arn
    container_name   = "todo-api"
    container_port   = 3000
  }

  network_configuration {
    subnets          = aws_subnet.private.*.id
    security_groups  = [aws_security_group.todo_api.id]
    assign_public_ip = false
  }

  # Auto-scaling
  lifecycle {
    ignore_changes = [desired_count]
  }
}

resource "aws_appautoscaling_target" "todo_api" {
  max_capacity       = 10
  min_capacity       = 3
  resource_id        = "service/${aws_ecs_cluster.main.name}/${aws_ecs_service.todo_api.name}"
  scalable_dimension = "ecs:service:DesiredCount"
  service_namespace  = "ecs"
}

resource "aws_appautoscaling_policy" "cpu" {
  name               = "todo-api-cpu-scaling"
  policy_type        = "TargetTrackingScaling"
  resource_id        = aws_appautoscaling_target.todo_api.resource_id
  scalable_dimension = aws_appautoscaling_target.todo_api.scalable_dimension
  service_namespace  = aws_appautoscaling_target.todo_api.service_namespace

  target_tracking_scaling_policy_configuration {
    target_value       = 70.0
    predefined_metric_specification {
      predefined_metric_type = "ECSServiceAverageCPUUtilization"
    }
  }
}
Best Practices
1. 에이전트 책임 분리
원칙: 각 에이전트는 단일 도메인에 집중
✅ 좋은 예:
- Architecture Agent: 시스템 설계만
- Coding Agent: 코드 구현만
- Testing Agent: 테스트만

❌ 나쁜 예:
- 만능 Agent: 설계 + 코딩 + 테스트 + 배포 전부이점:
- 복잡도 감소
- 디버깅 용이
- 컨텍스트 창 오버로드 방지
- 더 견고한 시스템
2. Quality Assurance Stage 추가
최종 검토 단계:
graph LR
    Arch[Architecture] --> Code[Coding]
    Code --> Test[Testing]
    Test --> Sec[Security]
    Sec --> DevOps[DevOps]
    DevOps --> QA[QA Agent<br/>최종 검토]
QA Agent 역할:
- 모든 에이전트 출력 검토
- 일관성 검증
- 품질 기준 충족 확인
- 문제 발견 시 해당 에이전트에게 재작업 요청
3. Human-in-the-Loop 통합
언제 사람이 개입해야 하는가?
| 상황 | HITL 필요 여부 | 이유 |
|---|---|---|
| 단순 CRUD API 구현 | ❌ | 완전 자동화 가능 |
| 복잡한 비즈니스 로직 결정 | ✅ | 도메인 전문가 판단 필요 |
| 보안 취약점 수정 | ✅ | 중요한 보안 결정 |
| 일반적인 테스트 작성 | ❌ | 자동화 가능 |
| 프로덕션 배포 승인 | ✅ | 최종 검토 필요 |
| 인프라 변경 | ✅ | 비용 및 영향 고려 |
구현 예시:
async function deployToProduction(deployment: Deployment) {
  // DevOps Agent가 배포 계획 생성
  const plan = await devopsAgent.createDeploymentPlan(deployment);

  // Human approval 요청
  const approval = await requestHumanApproval({
    title: 'Production Deployment Approval',
    plan: plan,
    estimatedDowntime: '0 minutes',
    risks: ['Database migration', 'Config changes'],
    rollbackPlan: plan.rollbackStrategy
  });

  if (!approval.approved) {
    throw new Error(`Deployment rejected: ${approval.reason}`);
  }

  // 승인 후 배포 진행
  return await devopsAgent.execute(plan);
}
4. 관찰 가능성 (Observability)
5가지 필수 관찰 영역 (Microsoft Azure 권장):
- 포괄적 로깅:
class AgentLogger {
  log(agent: string, event: string, data: any) {
    console.log(JSON.stringify({
      timestamp: new Date().toISOString(),
      agent: agent,
      event: event,
      data: data,
      trace_id: getTraceId()
    }));
  }
}

// 사용
logger.log('coding-agent', 'task-started', {
  task_id: 'impl-user-api',
  estimated_duration: '5m'
});- 성능 메트릭:
const metrics = {
  agent_execution_time: new Histogram({
    name: 'agent_execution_seconds',
    help: 'Agent execution time',
    labelNames: ['agent_name', 'task_type']
  }),

  agent_errors: new Counter({
    name: 'agent_errors_total',
    help: 'Total agent errors',
    labelNames: ['agent_name', 'error_type']
  })
};

// 사용
const timer = metrics.agent_execution_time.startTimer({
  agent_name: 'coding-agent',
  task_type: 'generate-code'
});

try {
  await codingAgent.execute(task);
} catch (error) {
  metrics.agent_errors.inc({
    agent_name: 'coding-agent',
    error_type: error.constructor.name
  });
} finally {
  timer();
}- 품질 및 안전 표준 검증
- 규정 준수 모니터링
- 사용자 경험 최적화
5. 에러 패턴 학습
Microsoft AI Red Team의 12가지 실패 패턴 참고:
// 실패 패턴 감지 및 학습
class FailurePatternDetector {
  private patterns: Map<string, FailurePattern> = new Map();

  recordFailure(agent: string, error: Error, context: any) {
    const pattern = this.identifyPattern(error, context);

    if (this.patterns.has(pattern.id)) {
      const existing = this.patterns.get(pattern.id)!;
      existing.occurrences++;
      existing.contexts.push(context);
    } else {
      this.patterns.set(pattern.id, {
        id: pattern.id,
        agent: agent,
        errorType: error.constructor.name,
        occurrences: 1,
        contexts: [context]
      });
    }

    // 패턴이 3회 이상 반복되면 알림
    if (this.patterns.get(pattern.id)!.occurrences >= 3) {
      this.alertRecurringPattern(pattern);
    }
  }
}
미래 전망
2025년: “에이전틱 AI의 해”
업계 리더들의 합의: 2025년은 에이전틱 AI의 해
주요 트렌드:
-
조 단위 시장 기회
- AI 소프트웨어 개발 스택: 조 달러 규모 시장
- 전 세계 3천만 개발자가 AI 코딩 어시스턴트 사용
- 생산성 향상으로 전 세계 GDP에 조 단위 가치 창출
-
프로토타입에서 프로덕션으로
- 2023-2024: 생성형 AI (GPT, 이미지 생성)
- 2025+: 자율 에이전틱 시스템 (실제 업무 자동화)
-
프로토콜 표준화
- 78%의 글로벌 조직이 MCP 또는 A2A 프로토콜 사용
- 업계 전반의 상호 운용성
-
Sovereign AI
- 데이터 주권 및 지정학적 복원력
- 자율 에이전트의 규정 준수 및 감사 가능성
- 핵심 인프라 배포
-
자가 치유 시스템 (Self-Healing)
- 자율적 에러 탐지 및 복구
- 적응형 시스템 복원력
- 인간 개입 없이 문제 해결
개발자 역할의 재정의
Before (전통적 개발):
- 코드 작성 70% + 설계 20% + 테스트 10%
After (에이전트 오케스트레이션):
- 요구사항 정의 30% + 에이전트 관리 40% + 검증 20% + 최적화 10%
핵심 스킬 변화:
| 전통적 스킬 | 중요도 | 새로운 핵심 스킬 |
|---|---|---|
| 코딩 속도 | ↓↓ | 요구사항 명확화 |
| 문법 지식 | ↓ | 시스템 아키텍처 |
| 디버깅 | → | 에이전트 프롬프트 엔지니어링 |
| 알고리즘 | → | 멀티 에이전트 오케스트레이션 |
| 코드 리뷰 | ↓ | 에이전트 출력 검증 |
시작하기
1주차: 프레임워크 선택 및 학습
# LangGraph 설치 (추천: 프로덕션 시스템)
pip install langgraph langchain-openai

# 또는 CrewAI (추천: 빠른 프로토타이핑)
pip install crewai langchain-openai

# 환경 변수 설정
export OPENAI_API_KEY="your-api-key"
학습 자료:
2주차: 소규모 프로젝트 구현
추천 시작 프로젝트:
- 간단한 REST API (2-3개 엔드포인트)
- Architecture Agent + Coding Agent만 사용
- 수동 테스트 및 배포
3주차: 전체 파이프라인 확장
5개 에이전트 통합:
- Testing Agent 추가 → 자동화된 테스트
- Security Agent 추가 → 보안 스캐닝
- DevOps Agent 추가 → CI/CD 파이프라인
1개월 후: 프로덕션 투입
성과 측정:
- 개발 속도 향상률
- 버그 감소율
- 테스트 커버리지
- 팀 만족도
결론
멀티 에이전트 시스템은 더 이상 미래가 아닙니다. 지금 당장 적용할 수 있는 현실입니다.
핵심 요약:
- 5개 전문 에이전트: Architecture, Coding, Testing, Security, DevOps
- 오케스트레이션 패턴: 계층적, 이벤트 주도, 그래프 기반
- 통신 프로토콜: MCP (도구 접근), A2A (에이전트 간 통신)
- 복원력: Fallback, Circuit Breaker, Canary 배포
- Best Practices: 책임 분리, QA 단계, HITL, 관찰 가능성
실제 성과:
- 도요타: 연간 10,000시간 절약
- E-commerce API: 버그 70% 감소, 리팩토링 75% 단축
- 전문 개발자: 구현 시간 35% 단축, 결함 27% 감소
이제 여러분의 차례입니다. 5개의 AI 에이전트를 오케스트레이션하여, 혼자서도 풀스택 애플리케이션을 구축할 수 있는 새로운 시대가 열렸습니다.
참고 자료
공식 문서
프레임워크 비교
실전 사례
학술 논문
다음 글: 자가 치유 AI 시스템: 인간 개입 없이 자동으로 버그를 수정하는 에이전트 구축하기에서는 2025년 핵심 트렌드인 Self-Healing Systems의 구현 방법을 실전 코드와 함께 다룹니다.
다른 언어로 읽기
- 🇰🇷 한국어 (현재 페이지)
- 🇯🇵 日本語
- 🇺🇸 English
- 🇨🇳 中文
글이 도움이 되셨나요?
더 나은 콘텐츠를 작성하는 데 힘이 됩니다. 커피 한 잔으로 응원해주세요! ☕